Effectively manage the temperature within buildings
Energy
Administration
Agriculture, viticulture
Aid and care sector
Commerce
Craft Industry
Manufacturing
Last update: 14/07/2026
Possibilité d’accompagnement
Subvention disponible
To make this measure more effective and tailored to the specific context of your company, we recommend that you first perform an overall analysis of your energy situation.
Effectively manage the temperature within buildings
The ambient temperature in the workplace is essential to ensure that employees feel comfortable and can work in optimal conditions. It should be adjusted according to the activities carried out on site.
Energy consumption for heating can fluctuate depending on the weather and due to air leaks in the building envelope, especially when it’s poorly or not insulated. For more information on ways to improve the building envelope, please refer to the measure Improving the energy efficiency of the building envelope
Definition of requirements
Assessing heating and air conditioning usage optimisation requirements
Optimising a building’s heating can lead to energy savings of up to 10% of total energy costs. Simple adjustment can prevent premises from overheating. In buildings, each additional degree increases heating costs by approximately 6%.
Depending on the type of activity, the minimum recommended temperature are:
20 °C for office spaces
19 °C for workplaces where tasks are mainly performed while seated
17 °C for workplaces where tasks are mainly performed while standing or in motion
12 °C for workplaces involving heavy physical labour.
These minimum temperatures must be reached before work resumes.
The maximum indoor temperature should normally not exceed 26 °C, unless when the outdoor temperature is higher.
Glazed surfaces should be designed to prevent excessive solar heat gain in the workplace.
A need for optimisation may arise, for example, when users complain about thermal discomfort or when measured temperatures deviate from the recommended values.
Questions to ask yourself before you start:
Do employees feel comfortable in the building (at their workstations, in meeting rooms, etc.)?
How is the heating regulated in the building? Is this individual or centrally management?
Is there a temperature controller for off-peak periods? (e.g. automatic night mode)
Is energy consumption monitored and compared with previous years?
Can employees manually heat or cool specific areas of the building?
Have individual temperature limits been set?
Is the general heating set according to employee requests or based on minimum required temperatures?
Identifying the solution and checking feasibility
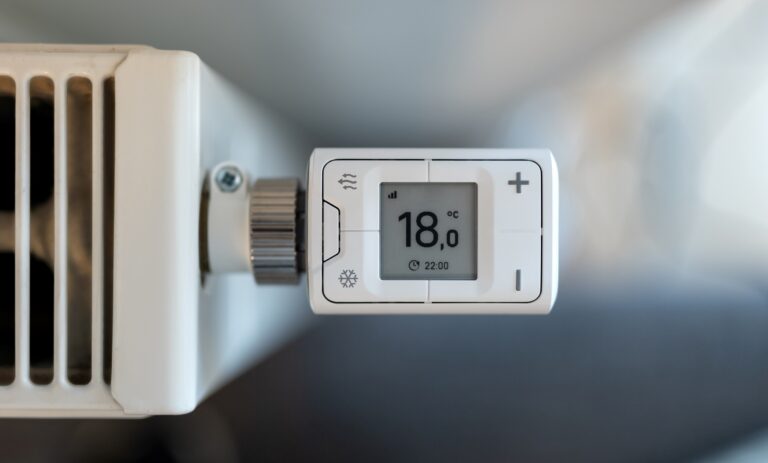
Properly adjust thermostatic valves
Check whether thermostatic valves are defective, dirty or incorrectly set, especially at the beginning of the heating season. This can be identified when some rooms are noticeably too hot or too cold compared to others.
Secure thermostats in public areas
In public areas such as corridors, toilets or showers, thermostatic valves are often subject to tampering. It is possible to limit the temperature range using pins or clips to avoid unnecessary heating.
Bleed radiators
If radiators make noise (bubbling, gurgling, whistling, etc.) or are only partially warm, they should be bled to improve the efficiency of the system.
Adjust the heating curve
If users complain about the ambient temperature, or if night-time temperatures do not drop despite night mode being active, this is often due to incorrect heating curve set.
Lower the flow temperature in general and/or outside operating hours
Check whether the flow temperature can be reduced – it is often unnecessarily high. A high flow temperature outside operational hours (e.g. nights and weekends) leads to heat losses. A hydraulic balancing, carried out by a heating professional, can help reduce this temperature
Insulate pipes and fittings
Poor insulation of heating, hot water and steam pipes leads to significant heat loss.
Implementation of specific measures
Properly adjust thermostatic valves
Ensure that all thermostatic valves in the same room are set to the same temperature. The markings and settings on valves may vary depending on the manufacturer, but the following indicative values can serve as a reference for adjusting room temperature:
Position 1: approx. 14 °C
Position 2: approx. 17 °C
Position 3: approx. 20 °C
Position 4: approx. 23 °C
Position 5: approx. 26 °C
Position *: approx. 7°C (frost protection)
Allow heated air to circulate
To ensure proper air circulation and prevent heat build-up, it is important not to cover the radiator, the thermostatic valve or the perforated radiator cap. If the valve is located in an area where heat accumulates, the measured temperature will be too high and therefore inaccurate. Free air circulation around the radiator helps distribute heat evenly inside the room.
To unblock a valve: – Turn the thermostat to the maximum setting to relieve the pressure on the valve stem. – Remove the thermostatic head. – Loosen the valve stem (if needed, spray penetrating oil and gently tap the stem with a rubber mallet). – Reassemble the thermostatic head and set it to the desired temperature.
Secure thermostats in public areas
The lower and upper limits are fixed using a pin or clip. Make sure that all the valves in a room have the same adjustment range.
Bleed radiators
The following steps must be followed when bleeding radiators:
Turn on the heating and allow the system to heat up fully.
Turn off the circulation pump.
Wait one hour for the hot air to rise.
Turn the circulation pump back on and fully open the thermostatic valves (position 5).
Start with the lowest radiator (usually on the ground floor) and work up to the top floor.
Carefully open the bleed valve using a square key, while placing a container underneath to collect the water (be careful, the water may be very hot).
Close the valve as soon as all the air has escaped and only water is coming out.
Check the pressure on the central heating system’s pressure gauge (for every 10 m of building height, approximately 1 bar of pressure is required, plus the supply pressure from the expansion tank to reach the necessary pressure).
If the pressure is too low, add water (see the box on heating water quality).
Regulation
Adjusting the heating curve:
Set the target temperatures (e.g. 21 °C for offices) and identify rooms that are difficult to heat (e.g. north-facing, exterior-facing, top floor or corners rooms).
Check and analyse the ambient temperature.
If the heating curve is set too low, the target temperature will not be reached and users will complain.
If the heating curve is set too high, the ambient temperature can be lowered using the thermostatic valve, but a high flow temperature causes heat loss in the production and distribution system (e.g. no night setback or general temperature reduction).
Correct the heating curve.
Lower the flow temperature by 3 °C during the heating period
General rule: for radiators, lowering the curve by 5 °C reduces the ambient temperature by about 1 °C and vice versa. For underfloor heating, lowering the curve by 2 °C reduces the ambient temperature by about 2 °C.
If the ambient temperature is too low in cold weather (below 0 °C), increase the flow temperature
General rule: for radiators, raising the curve by 5 °C increases the ambient the ambient temperature by 2.5 °C, for underfloor heating, raising the curve by 2 °C increases the ambient temperature by 2 °C.
Adjust the heating limit: lower the limit by 1 °C during transitional seasons, ideally in autumn, on overcast days, and when the outside temperature is between 12 and 18 °C
Type of building
Indicative values for the heating limit for an ambient temperature of 20 °C
Non-insulated buildings constructed before 1970
15 to 17 °C
Buildings built between 1977 and 1995
14 to 16 °C
Buildings built between 1995 and 2010
12 to 15 °C
Modern buildings
9 to 14 °C
Passive houses
8 to 10 °C
Take measurements: record the ambient temperatures during the two weeks following any changes to the heating curve.
Repeat steps 4 and 5 (adjust the heating limit and take measurements) until the desired temperature is no longer maintained (complaints arise), the adjust settings if necessary.
Correctly set the temperature via thermostatic valves and record the results as well as the new target values in a logbook.
Carefully note every change to the heating curve (values before and after modification).
Inform all relevant personnel of the adjustments made.
Verify that the outside temperature and the time displayed on the heating control are correct. extérieure et l’heure indiquées sur la commande de chauffage soient correctes.
Baisser la température de départ en dehors des heures d’exploitation
Dans un premier temps, déterminer les pièces et les plages horaires pour lesquelles la température sera abaissée.
Abaisser la température de départ de 2 °C maximum sur la commande du chauffage pour les périodes et pièces concernées (idéalement lorsque la température extérieure nocturne est proche de 0 °C). Documenter tous les changements dans le carnet de bord.
Observer l’effet du changement pendant au moins trois jours :
La température ambiante est-elle respectée lors de l’utilisation ?
Y a-t-il des problèmes de condensation liés à un taux d’humidité de l’air trop élevé ?
Répéter l’abaissement comme décrit ci-dessus jusqu’à ce que la température ambiante choisie ne puissent plus être respectée ou que des problèmes de condensation apparaissent. Dans ce cas, remonter la température de départ avant la dernière baisse.
Lowering the supply temperature outside operating hours
First, identify the rooms and time periods for which the temperature will be lowered.
Reduce the supply temperature by a maximum of 2 °C on the heating control for the relevant periods and rooms (ideally when the outside night temperature is close to 0 °C). Document all changes in the logbook.
Monitor the effect of the change for at least three days:
Is the ambient temperature maintained during usage?
Are there any condensation issues caused by excessive air humidity?
Repeat the reduction as described above until the chosen ambient temperature can no longer be maintained or condensation problems appear. In that case, increase the supply temperature back to the level before the last reduction.
Insulating pipes and fittings
All pipes and plumbing (hand taps, valves, pumps etc.) located in unheated rooms should be insulated to prevent energy loss. It is also recommended to regularly check the insulation of existing pipes.
State subsidy application
State subsidies
Attention: incentive effect to be complied with when applying for subsidies (state or otherwise) and subject to meeting the eligibility conditions.
To ensure that the ‘incentive effect’ is respected, no binding commitment (signing a quotation; paying an advance) may be made BEFORE submitting the application file or receiving the agreement in principle from the State or the electricity and natural gas supplier following an application for aid.
Aid for small and medium-sized companies, covering up to 70% of eligible costs for carrying out a project aimed at reducing their environmental impact. The total project cost must be between €3.000 and €25.000 excluding VAT.
Aid for small and medium-sized enterprises, up to 10% or 20% of the amount of miscellaneous investments aimed at promoting the modernisation and competitiveness of the Luxembourg economy.
N.B. State subsidies cannot be combined for the same project.
Subsidies from electricity and natural gas suppliers
Since 2015, natural gas and electricity suppliers have been required to help consumers achieve energy savings as part of the obligation scheme.
Since then, energy suppliers have been offering support and advisory services, as well as subsidy programmes for consumers to implement energy efficiency measures.
The following suppliers offer this service to companies:
In 2026, enoprimes will celebrate its 10th anniversary. On this occasion, special incentives are being offered to businesses for any project initiated between 1 July and 31 December 2026, generating < 1,500 MWh of energy savings and not already benefiting from a preferential tariff scheme.
N.B. Supplier subsidies can be combined with any state subsidies for the same project.
After the implementation of works
Properly adjust thermostatic valves
Check thermostatic valves annually at the start of the heating season.
Secure thermostats in public areas
If there are changes in the use of rooms, it may be necessary to adjust the limitation mechanism on thermostats.
Bleed radiators
Radiators should ideally be bled every three years.
Adjust the heating curve
Each adjustment of the heating curve should be monitored. Changes depend on feedback from users of the affected rooms.
Lower the supply temperature outside operating hours
When operating hours are adjusted, the supply temperature reduction settings should also be adapted accordingly.
Insulate pipes and fittings
Any changes to technical rooms may result in uninsulated lines or piping. It is therefore recommended to consider this when planning such modifications.
Occasionally, insulation may need to be removed for maintenance work. In these cases, ensure that insulation is properly reinstated once the work is completed.